为何一个文件两次压缩的MD5不一样?这里究竟发生了什么,我为什么总是给自己挖坑?(~ ̄▽ ̄)~
问题背景 事情是这样的,某天需要对一批陈旧的文件对比校验,这批文件放在2个位置,如果对比结果一致就可以清掉一处,把磁盘空出来。这里用A、B主机区分好了。
这也是后面问题产生的根源。
当时的认知是同一个文件,文件内容没有任何变化,那么我将A主机的文件夹再压缩回去,MD5应该和B主机一样,结果并非我想的这样。开始以为是压缩软件的问题,使用了Bandizip、7Zip、Zip for Windows对A主机文件夹进行压缩,得到了三个不同的MD5,均和B主机不一致,甚至同一个压缩软件连续压缩两次产生的MD5都不一样,就这让我怀疑人生,当时猜测可能和时间戳、压缩算法等有关系,但是没有证据,就很难受。
排查原因 自己挖坑自己填,发现问题就得查,回到家后开始模拟。首先创建一个test.txt,里面写入了一段文本内容,再次通过不同的压缩软件压缩、相同软件不同时间段压缩,得到了和上述相同的情况。首先想到的是通过HEX分析文件哪里不同。
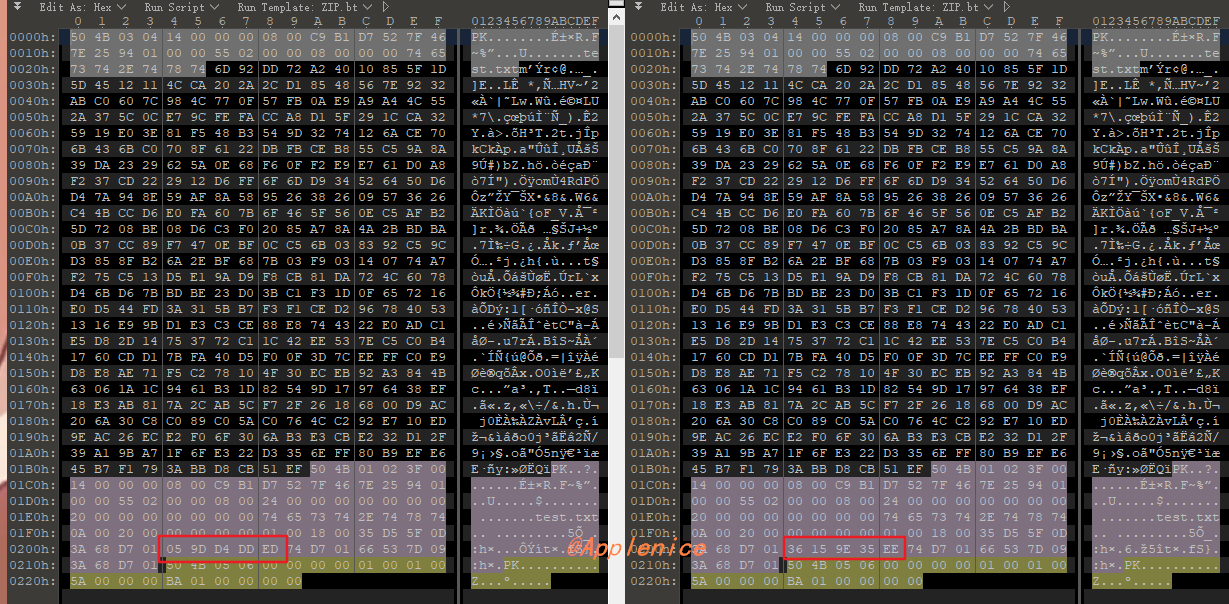
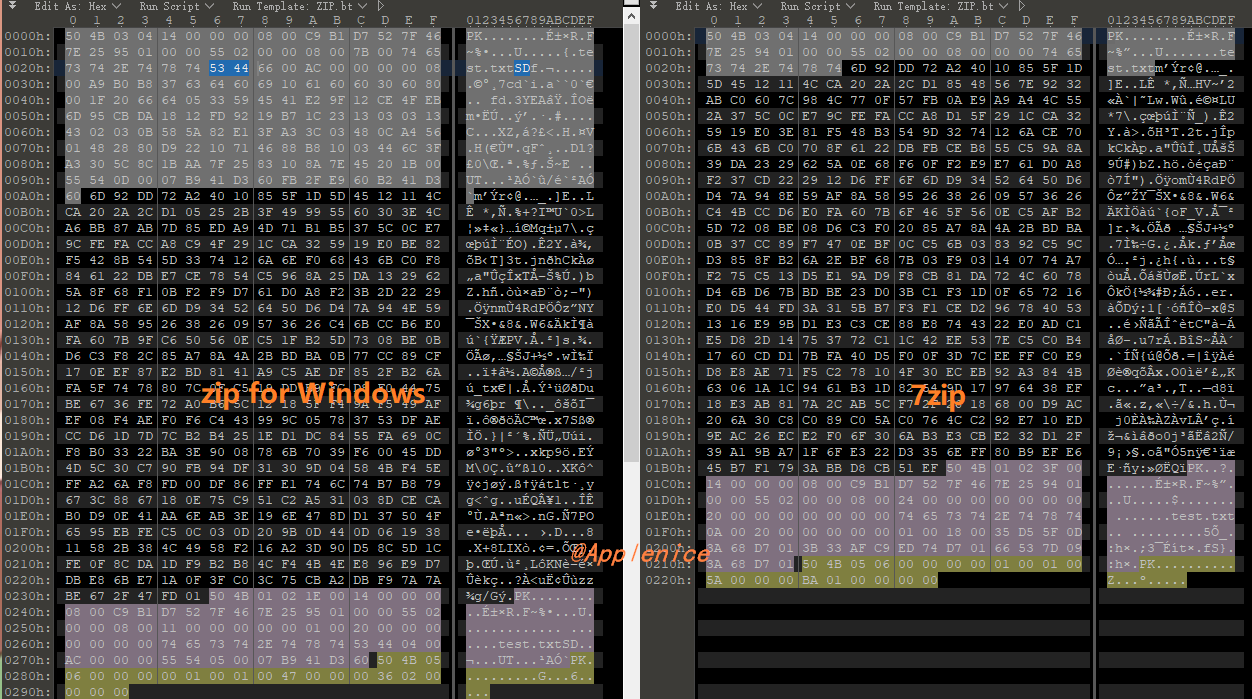
以相同软件不同时间段压缩举例,通过对比HEX,可以发现在压缩文件的中部有几个字节明显不一致:
而010 Editor中并没有将此处的值解析出来,告诉我们这里代表什么。
进行到这,想着通过调试压缩软件源代码的方式继续找答案了。这里选的是7zip,因为用的人比较多,找相关的资料也会方便一些。Zip for Windows虽然也有源代码,但看起来资料很少,只能先放放。按照网上的文章,通过Visual Studio 2017编译7z1900-src中的Format7z确实成功了,不过编译出来的是dll文件,这难度就高一些,进行不下去。
调试不行,就只能分析源码,好在7zip的代码结构非常非常的清晰,同时也看了7zip源码分析相关的文章。
Archive 目录,包含各种 archive 算法的代码。因为7z不光支持7z文件,还支持zip, rar, chm等其他的打包文件格式。进入到ZIP目录,ZipHeader.h中清晰的描述了Signature、CompressionMethod、ExtraID、HostOS等标识,这里结合HEX值、代码在分析十分有用。
首先查看Signature:
1
2
3
4
5
6
7
8
9
10
11
namespace NSignature{ const UInt32 kLocalFileHeader = 0x04034B50 ; const UInt32 kDataDescriptor = 0x08074B50 ; const UInt32 kCentralFileHeader = 0x02014B50 ; const UInt32 kEcd = 0x06054B50 ; const UInt32 kEcd64 = 0x06064B50 ; const UInt32 kEcd64Locator = 0x07064B50 ; const UInt32 kSpan = 0x08074B50 ; const UInt32 kNoSpan = 0x30304B50 ; }
在文件HEX开头的054B0304对应kLocalFileHeader、中间的504B0102对应kCentralFileHeader。因为是生成压缩文件,那么可直接在ZipOut.cpp进行搜索定位到WriteCentralHeader函数:
1
2
3
4
5
6
7
8
9
10
11
12
13
14
15
16
17
18
19
20
21
22
23
24
25
26
27
28
29
30
31
32
33
34
35
36
37
38
39
40
41
42
43
44
45
46
47
48
49
50
51
52
53
54
55
56
57
58
59
60
61
62
63
64
65
void COutArchive::WriteCentralHeader (const CItemOut &item) bool isUnPack64 = DOES_NEED_ZIP64 (item.Size); bool isPack64 = DOES_NEED_ZIP64 (item.PackSize); bool isPosition64 = DOES_NEED_ZIP64 (item.LocalHeaderPos); bool isZip64 = isPack64 || isUnPack64 || isPosition64; Write32 (NSignature::kCentralFileHeader); Write8 (item.MadeByVersion.Version); Write8 (item.MadeByVersion.HostOS); WriteCommonItemInfo (item, isZip64); Write32 (item.Crc); WRITE_32_VAL_SPEC (item.PackSize, isPack64); WRITE_32_VAL_SPEC (item.Size, isUnPack64); Write16 ((UInt16)item.Name.Len ()); UInt16 zip64ExtraSize = (UInt16)((isUnPack64 ? 8 : 0 ) + (isPack64 ? 8 : 0 ) + (isPosition64 ? 8 : 0 )); const UInt16 kNtfsExtraSize = 4 + 2 + 2 + (3 * 8 ); const UInt16 centralExtraSize = (UInt16)( (isZip64 ? 4 + zip64ExtraSize : 0 ) + (item.NtfsTimeIsDefined ? 4 + kNtfsExtraSize : 0 ) + item.CentralExtra.GetSize ()); Write16 (centralExtraSize); const UInt16 commentSize = (UInt16)item.Comment.Size (); Write16 (commentSize); Write16 (0 ); Write16 (item.InternalAttrib); Write32 (item.ExternalAttrib); WRITE_32_VAL_SPEC (item.LocalHeaderPos, isPosition64); WriteBytes ((const char *)item.Name, item.Name.Len ()); if (isZip64) { Write16 (NFileHeader::NExtraID::kZip64); Write16 (zip64ExtraSize); if (isUnPack64) Write64 (item.Size); if (isPack64) Write64 (item.PackSize); if (isPosition64) Write64 (item.LocalHeaderPos); } if (item.NtfsTimeIsDefined) { Write16 (NFileHeader::NExtraID::kNTFS); Write16 (kNtfsExtraSize); Write32 (0 ); Write16 (NFileHeader::NNtfsExtra::kTagTime); Write16 (8 * 3 ); WriteNtfsTime (item.Ntfs_MTime); WriteNtfsTime (item.Ntfs_ATime); WriteNtfsTime (item.Ntfs_CTime); } WriteExtra (item.CentralExtra); if (commentSize != 0 ) WriteBytes (item.Comment, commentSize); }
可以看出到整个CentralHeader的结构十分清晰,手工计算部分变量值、偏移能够对应上。不计算也可以更快速的定位:
1 WriteBytes ((const char *)item.Name, item.Name.Len ());
很明显写了文件名test.txt,一眼就看到。再往下就是NtfsTimeIsDefined的判断,看到这里太高兴了。
1
2
3
4
5
6
7
8
0001b0 45 b7 f1 79 3a bb d8 cb 51 ef 50 4b 01 02 3f 00 E..y:...Q.PK..?. 0001c0 14 00 00 00 08 00 c9 b1 d7 52 7f 46 7e 25 94 01 .........R.F~%.. 0001d0 00 00 55 02 00 00 08 00 24 00 00 00 00 00 00 00 ..U.....$....... 0001e0 20 00 00 00 00 00 00 00 74 65 73 74 2e 74 78 74 .......test.txt 0001f0 0a 00 20 00 00 00 00 00 01 00 18 00 35 d5 5f 0d .. .........5._. 000200 3a 68 d7 01 36 15 9e 35 ee 74 d7 01 66 53 7d 09 :h..6..5.t..fS}. 000210 3a 68 d7 01 50 4b 05 06 00 00 00 00 01 00 01 00 :h..PK.......... 000220 5a 00 00 00 ba 01 00 00 00 00 Z.........
kNTFS在ExtraID的值就是0x0A哇。
1
2
3
4
5
6
7
8
9
10
11
12
13
14
namespace NExtraID{ enum { kZip64 = 0x01 , kNTFS = 0x0A , kStrongEncrypt = 0x17 , kUnixTime = 0x5455 , kUnixExtra = 0x5855 , kIzUnicodeComment = 0x6375 , kIzUnicodeName = 0x7075 , kWzAES = 0x9901 }; }
逐个计算下来,问题应该在Ntfs_MTime、Ntfs_ATime、Ntfs_CTime的部分上。相关的定义:
1
2
3
4
5
6
7
8
9
10
11
12
13
14
15
16
17
18
19
20
21
22
23
class CItemOut : public CItem{ public : FILETIME Ntfs_MTime; FILETIME Ntfs_ATime; FILETIME Ntfs_CTime; bool NtfsTimeIsDefined; CItemOut (): NtfsTimeIsDefined (false ) {} }; typedef struct _FILETIME { DWORD dwLowDateTime; DWORD dwHighDateTime; } FILETIME, *PFILETIME, *LPFILETIME; #define _FILETIME_
那么问题来了,这三个时间又是啥?
NTFS Timestamp 关于这三个时间在检索的时候没发现微软有相关的文档进行介绍(可能是方式不对…),资料也不多。其中有一篇日文资料写的比较清楚,放在参考里。
Windows NTFS使用MACB时间:
Modified
Accessed
Changed ($MFT Modified)
Birth (file creation time)
那么该怎么从文件中读取到这些值呢?可以通过比较常用的取证工具Autospy来获取,安装和使用可以网上搜索一下,非常简单的。
1
2
3
4
5
文件名称: E:\Win10-ZIPTest\test-0212-01.zip MD5: 798c5015454ba25fdc79f5ef62986dcf 文件名称: E:\Win10-ZIPTest\test-0214-01.zip MD5: 9cacd3b63d051253a4542ec045c3a58c
将测试目录导入Autospy后,就可以查看File Metadata了:
1
2
3
4
5
6
7
8
9
10
11
12
13
Name /LogicalFileSet2/Win10-ZIPTest/test-0214-01.zip/test.txt Modified 2021-06-23 22:14:17 CST Accessed 2021-07-10 02:14:08 CST Created 2021-06-23 22:14:10 CST Changed 0000-00-00 00:00:00 Name /LogicalFileSet2/Win10-ZIPTest/test-0212-01.zip/test.txt Modified 2021-06-23 22:14:17 CST Accessed 2021-07-10 02:11:40 CST Created 2021-06-23 22:14:10 CST Changed 0000-00-00 00:00:00
其中6月23日是创建test.txt的时间,可看出两个压缩包的Accessed时间明显不一致,也就说在Windows 10上7zip对同一个文件连续压缩两次产生不同MD5的原因和FILETIME有关。
软件对比 知道Windows 10的FILETIME变化会导致MD5不同后,我想看看其他软件是不是也是这个原因造成的。
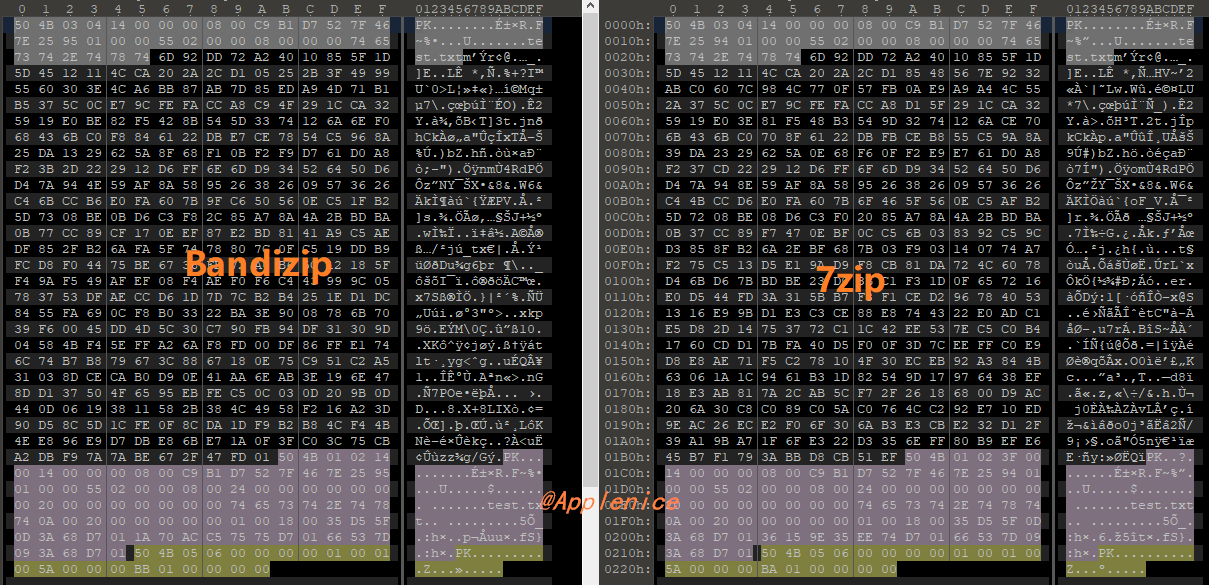
Bandizip Bandizip也是非常好用的压缩软件,连续两次压缩产生的MD5不一样。对比步骤:
2、对比两次Bandizip压缩文件HEX,同样是在压缩文件的中部有几个字节明显不一致。
3、通过Autospy查看Accessed时间,的确不一样。
1
2
3
4
5
6
7
8
9
10
11
12
13
14
15
Name /LogicalFileSet6/Win10-ZIPTest/test-bandizip-01.zip/test.txt Modified 2021-06-23 22:14:17 CST Accessed 2021-07-10 13:32:26 CST Created 2021-06-23 22:14:10 CST Changed 0000-00-00 00:00:00 Name /LogicalFileSet6/Win10-ZIPTest/test-bandizip-02.zip/test.txt Modified 2021-06-23 22:14:17 CST Accessed 2021-07-10 18:24:31 CST Created 2021-06-23 22:14:10 CST Changed 0000-00-00 00:00:00
可以确定Bandizip对同一文件连续压缩两次MD5不同也是由于Accessed变化导致的。
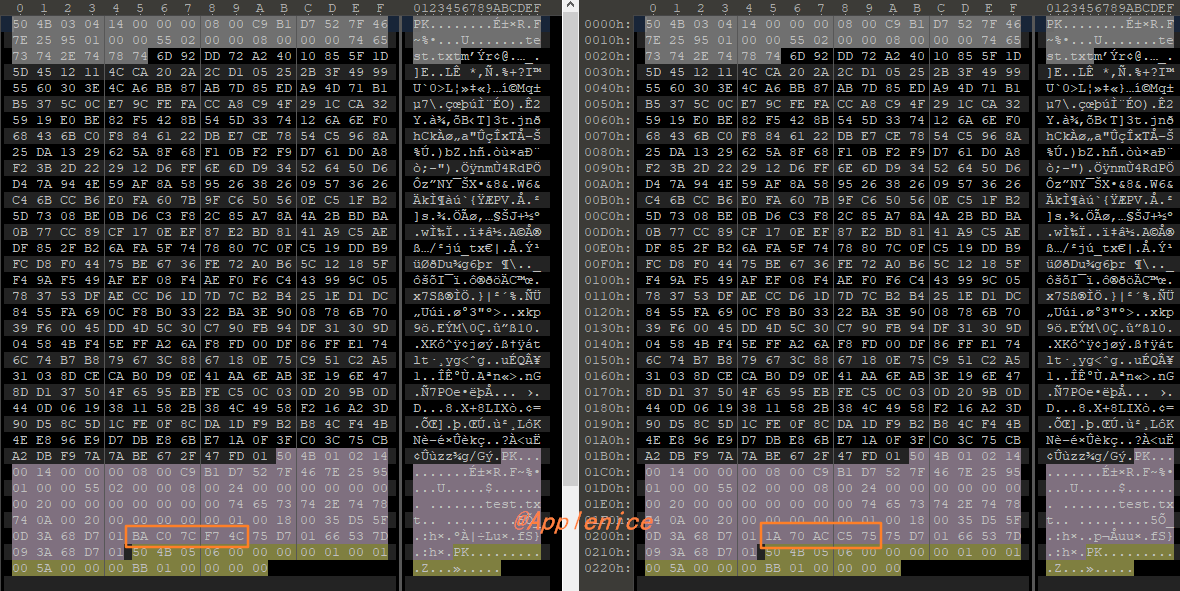
Zip for Windows Zip for Windows的对比步骤与上面一样,但在第一步就有明显的区别:
2、对比两次Zip for Windows压缩文件HEX,有几个字节明显不一致:
3、通过Autospy查看Accessed时间,会发现Accessed、Created时间都是0000-00-00 00:00:00:
1
2
3
4
5
6
7
8
9
10
11
12
13
14
15
Name /LogicalFileSet6/Win10-ZIPTest/zip-test-01.zip/test.txt Modified 2021-06-23 22:14:17 CST Accessed 0000-00-00 00:00:00 Created 0000-00-00 00:00:00 Changed 0000-00-00 00:00:00 Name /LogicalFileSet6/Win10-ZIPTest/zip-test-02.zip/test.txt Modified 2021-06-23 22:14:17 CST Accessed 0000-00-00 00:00:00 Created 0000-00-00 00:00:00 Changed 0000-00-00 00:00:00
这就很让人头大,和7zip的分析结果完全不一样了,需要找出那几个字节代表的啥。
打开Zip for Windows的源代码,在zip.h中找到了结构体zlist,可以看一下怎么定义的,就不具体贴出来了:
1 2 3 struct zlist { ........
看一下头部的数据
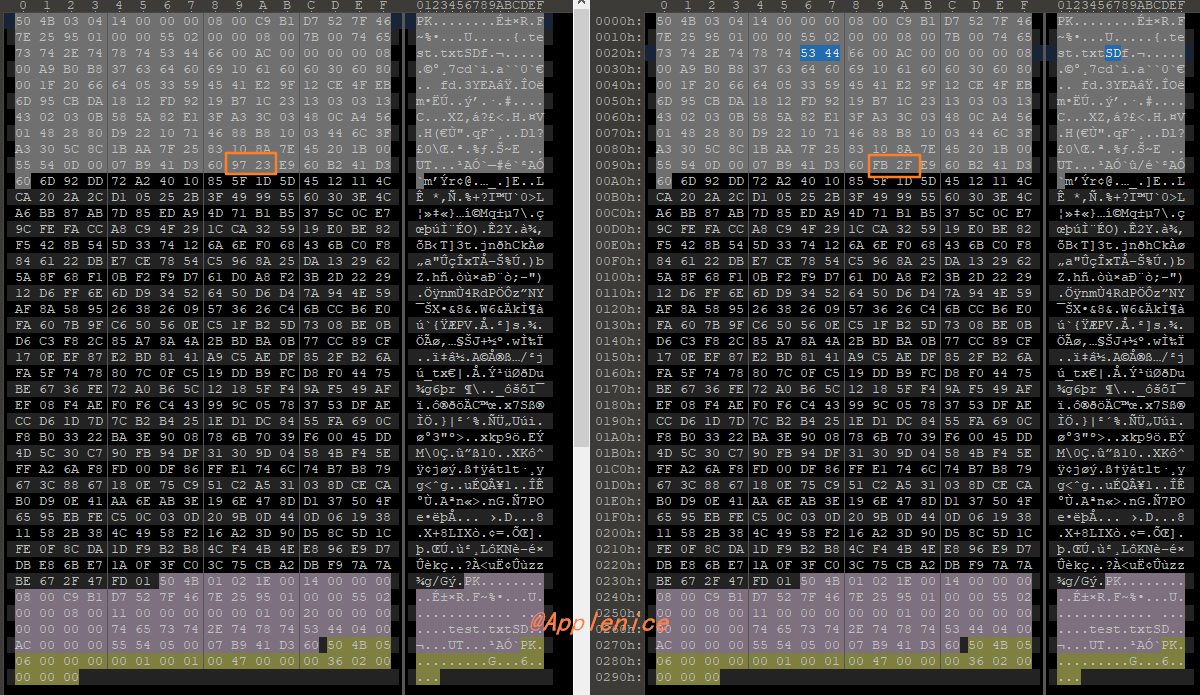
1
2
3
4
5
6
7
8
9
10
11
000000 50 4b 03 04 14 00 00 00 08 00 c9 b1 d7 52 7f 46 PK...........R.F 000010 7e 25 95 01 00 00 55 02 00 00 08 00 7b 00 74 65 ~%....U.....{.te 000020 73 74 2e 74 78 74 53 44 66 00 ac 00 00 00 00 08 st.txtSDf....... 000030 00 a9 b0 b8 37 63 64 60 69 10 61 60 60 30 60 80 ....7cd`i.a``0`. 000040 00 1f 20 66 64 05 33 59 45 41 e2 9f 12 ce 4f eb .. fd.3YEA....O. 000050 6d 95 cb da 18 12 fd 92 19 b7 1c 23 13 03 03 13 m..........#.... 000060 43 02 03 0b 58 5a 82 e1 3f a3 3c 03 48 0c a4 56 C...XZ..?.<.H..V 000070 01 48 28 80 d9 22 10 71 46 88 b8 10 03 44 6c 3f .H(..".qF....Dl? 000080 a3 30 5c 8c 1b aa 7f 25 83 10 8a 7e 45 20 1b 00 .0\....%...~E .. 000090 55 54 0d 00 07 b9 41 d3 60 97 23 e9 60 b2 41 d3 UT....A.`.#.`.A. 0000a0 60 6d 92 dd 72 a2 40 10 85 5f 1d 5d 45 12 11 4c `m..r.@.._.]E..L
再通过Zip for Windows压缩一个不同的文件,比如EXE等都行,对比发现53 44、55 54几处附近是没有变化的。查找相关的宏定义:
1 2 3 #define EF_NTSD 0x4453 #define EF_TIME 0x5455
从上面的图片中可以看到不一致的字节位置在EF_TIME后面,所以分析这些字节代表什么就可以了。
可以检索到函数,这里举例:
1
2
3
4
5
6
7
8
9
10
11
12
13
14
15
16
17
18
19
20
21
22
23
24
25
local int ef_scan_ut_time (ef_buf, ef_len, ef_is_cent, z_utim) { .... switch (eb_id) { case EF_TIME: flags &= ~0x00ff ; have_new_type_eb = TRUE; if ( eb_len >= EB_UT_MINLEN && z_utim != NULL ) { unsigned eb_idx = EB_UT_TIME1; Trace((stderr ,"ef_scan_ut_time: Found TIME extra field\n" )); flags |= (ef_buf[EB_HEADSIZE+EB_UT_FLAGS] & 0x00ff ); if ((flags & EB_UT_FL_MTIME)) { if ((eb_idx+4 ) <= eb_len) { z_utim->mtime = LG((EB_HEADSIZE+eb_idx) + ef_buf); eb_idx += 4 ; Trace((stderr ," Unix EF modtime = %ld\n" , z_utim->mtime)); } else { flags &= ~EB_UT_FL_MTIME; Trace((stderr ," Unix EF truncated, no modtime\n" )); } } if (ef_is_cent) { break ; } ....
而get_ef_ut_ztime又调用了ef_scan_ut_time:
1
2
3
4
5
6
7
8
9
10
11
12
13
14
15
16
17
18
19
20
int get_ef_ut_ztime (z, z_utim) struct zlist far *z;iztimes *z_utim; { int r; #ifdef IZ_CHECK_TZ if (!zp_tz_is_valid) return 0 ; #endif r = ef_scan_ut_time(z->extra, z->ext, FALSE, z_utim); if (!r && z->cext > 0 && z->cextra != z->extra) r = ef_scan_ut_time(z->cextra, z->cext, TRUE, z_utim); return r; }
接下来可以在zip.c文件中找到几处调用get_ef_ut_ztime的地方:
1 2 3 4 5 6 #ifdef USE_EF_UT_TIME z_tim = (get_ef_ut_ztime(z, &z_utim) & EB_UT_FL_MTIME) ? unix2dostime(&z_utim.mtime) : z->tim; #else # define z_tim z->tim #endif
但是他们都和时间有关系,可以跟踪到zip.h:
1 2 3 4 5 6 typedef struct iztimes { time_t atime; time_t mtime; time_t ctime; } iztimes;
这样就可以确定Zip for Windows在Windows 10上压缩文件时与时间的变化有关系。但是为什么Autospy没有解析出来,显示的都是0000-00-00 00:00:00,我想可能和unix2dostime的实现或者Autospy解析有关系,这里就不去深究了。
另外插一句,Zip for Windows可以通过选项打印出压缩过程的整个阶段,可以辅助分析使用:
1
2
3
4
5
6
7
8
9
10
11
12
13
14
15
16
17
18
zip -r zip-test-09.zip test.txt -sd sd: Zipfile name 'zip-test-09.zip' sd: Command line read sd: Reading archive sd: Scanning files sd: Applying filters sd: Checking dups sd: Scanning files to update sd: fcount = 1 sd: Open zip file and create temp file sd: Creating new zip file sd: Zipping up new entries adding: test.txt (172 bytes security) (deflated 32%) sd: Get comment if any sd: Writing central directory sd: Writing end of central directory sd: Replacing old zip file sd: Setting file type
Windows 7对比 7zip 前面之所以说系统是Windows 10,先交代系统版本。是因为我在Windows 7虚拟机中观察到的测试结果和Windows 10完全不一样,在Windows 7中,使用相同版本7zip对同一个文件压缩两次,产生的文件MD5是相同的。
1
2
3
4
5
文件名称: C:\Users\VM\Desktop\ZIPTest\mmm-1242-01.zip MD5: 740e1dcb39b9d974ec19b4c2b3239711 文件名称: C:\Users\VM\Desktop\ZIPTest\mmm-1243-01.zip MD5: 740e1dcb39b9d974ec19b4c2b3239711
在Autospy中观察:
1
2
3
4
5
6
7
8
9
10
11
12
13
14
15
Name /LogicalFileSet1/ZIPTest/mmm-1242-01.zip/mmm.txt Modified 2021-07-10 12:35:48 CST Accessed 2021-07-10 12:35:39 CST Created 2021-07-10 12:35:39 CST Changed 0000-00-00 00:00:00 Name /LogicalFileSet1/ZIPTest/mmm-1243-01.zip/mmm.txt Modified 2021-07-10 12:35:48 CST Accessed 2021-07-10 12:35:39 CST Created 2021-07-10 12:35:39 CST Changed 0000-00-00 00:00:00
在Windows 7中Accessed时间不会产生变化。调整系统时钟的方式也进行了测试,压缩文件MD5同样不产生变化。
Zip for Windows 同一个文件连续压缩MD5相同(包括时钟调整),Autospy查看信息与Windows 10上一样,Accessed、Created时间都是0000-00-00 00:00:00,就不贴出来了。
结语 到这里我的疑问就解答完毕啦😃,其实不看源代码的话,可以直接调整操作系统时间,每次调整的时候再进行压缩,通过HEX值对比的方式找答案。
参考 1、https://docs.microsoft.com/en-us/windows/win32/api/minwinbase/ns-minwinbase-filetime https://cyberforensicator.com/2018/03/25/windows-10-time-rules/ https://forensixchange.com/posts/19_04_22_win10_ntfs_time_rules/ https://n-archives.net/articles/windows/ntfs-mft-timestamps/ https://superuser.com/questions/973547/how-can-i-display-all-8-ntfs-timestamps http://gnuwin32.sourceforge.net/packages/zip.htm https://www.cnblogs.com/shuidao/p/3262304.html https://www.cnblogs.com/shuidao/p/3266092.html https://github.com/sleuthkit/autopsy https://unix.stackexchange.com/questions/91197/how-to-find-creation-date-of-file