Pi-hole是一款开源且免费的DNS沉洞服务器(DNS sinkhole),能够在不安装任何客户端侧软件的前提下为设备提供网络内容屏蔽服务,非常轻量易用。
部署Docker Pi-hole 首先,我们查看Docker版本的Pi-hole项目地址: https://github.com/pi-hole/docker-pi-hole/
根据Quick Start中的步骤,我们创建一个docker-compose.yml的文件,内容如下:
1
2
3
4
5
6
7
8
9
10
11
12
13
14
15
16
17
18
19
20
21
22
23
24
version: "3" services: pihole: container_name: pihole image: pihole/pihole:latest ports: - "53:53/tcp" - "53:53/udp" - "67:67/udp" - "80:80/tcp" environment: TZ: 'America/Chicago' volumes: - './etc-pihole:/etc/pihole' - './etc-dnsmasq.d:/etc/dnsmasq.d' cap_add: - NET_ADMIN restart: unless-stopped
因为Pi-hole要使用自己服务来接管53端口,需要先关闭系统自身的DNS服务(dnsmasp或者systemd-resolved,与系统自身有关):
1
2
$ systemctl stop systemd-resolved $ systemctl disable systemd-resolved
否则会因为端口抢占导致异常:
1 ERROR: for pihole Cannot start service pihole: driver failed programming external connectivity on endpoint pihole (cfdba20c40213efab5b1b64f4b0d13ba69d057c77ae5a93daa00c72c45026f78): Error starting userland proxy: listen tcp4 0.0.0.0:53: bind: address already in use
接下来通过docker-compose来构建和运行:
1
2
3
4
5
$ docker-compose up -d $ docker ps -a CONTAINER ID IMAGE COMMAND CREATED STATUS PORTS NAMES 96544434cd8b pihole/pihole:latest "/s6-init" 4 minutes ago Up 12 seconds (health: starting) 0.0.0.0:53->53/udp, :::53->53/udp, 0.0.0.0:53->53/tcp, :::53->53/tcp, 0.0.0.0:80->80/tcp, 0.0.0.0:67->67/udp, :::80->80/tcp, :::67->67/udp pihole
安装好以后获取Pi-hole的admin密码:
1
2
$ docker logs pihole | grep random Assigning random password: XXXXXX
登陆后需要在Tools->Update Gravity中点击update来更新一次Adlist Domain。
安装Docker Ubuntu 为了验证下Pi-hole的功能,我们拉取一个Ubuntu镜像。
1
2
3
4
5
6
7
$ docker pull ubuntu $ docker run --itd -name ubuntu2204 ubuntu bash $ docker ps -a CONTAINER ID IMAGE COMMAND CREATED STATUS PORTS NAMES ab9df4706d20 ubuntu "bash" 11 seconds ago Up 10 seconds ubuntu2204 96544434cd8b pihole/pihole:latest "/s6-init" 59 minutes ago Up 52 minutes (healthy) 0.0.0.0:53->53/udp, :::53->53/udp, 0.0.0.0:53->53/tcp, :::53->53/tcp, 0.0.0.0:80->80/tcp, 0.0.0.0:67->67/udp, :::80->80/tcp, :::67->67/udp pihole
建立Docker网桥 我们需要将两个容器关联起来,放进一个网络,这时候需要使用网桥。查看默认的Docker Network:
1
2
3
4
5
6
root@vultr:~# docker network ls NETWORK ID NAME DRIVER SCOPE 9bc0938138d8 bridge bridge local 1416dde8df2c host host local 0880c95b544b none null local 438dfebf3ae1 root_default bridge local
接下来创建一个自定义的网络,将Ubuntu、Pi-hole都放在该网络中。
1
2
3
4
5
6
7
8
9
10
11
12
13
14
15
16
17
18
19
20
21
22
23
24
25
26
27
28
29
30
31
32
33
34
35
36
37
38
39
40
41
42
43
44
45
46
47
48
49
50
51
52
$ docker network create pihole_net 6da68e8d7f38a97b18e678e1f88fc86f5ec008166f4884466fc0ab7d88cb1fb3 $ docker network connect pihole_net ubuntu2204 $ docker network connect pihole_net pihole $ docker network inspect pihole_net [ { "Name": "pihole_net", "Id": "6da68e8d7f38a97b18e678e1f88fc86f5ec008166f4884466fc0ab7d88cb1fb3", "Created": "2022-07-10T04:22:45.146486559Z", "Scope": "local", "Driver": "bridge", "EnableIPv6": false, "IPAM": { "Driver": "default", "Options": {}, "Config": [ { "Subnet": "172.19.0.0/16", "Gateway": "172.19.0.1" } ] }, "Internal": false, "Attachable": false, "Ingress": false, "ConfigFrom": { "Network": "" }, "ConfigOnly": false, "Containers": { "96544434cd8b68b0afba312f92bcfcca19e6b2e0ef272b1d2c130ae3e57b200d": { "Name": "pihole", "EndpointID": "e239bd124cce627758c6a8d6e260c697a54e2afbe2859bcb093cc95e1fc4e287", "MacAddress": "02:42:ac:13:00:02", "IPv4Address": "172.19.0.2/16", "IPv6Address": "" }, "ab9df4706d2028d880c13ff0e4884ebe6499fc7f44c22458abee99a813118b37": { "Name": "ubuntu2204", "EndpointID": "4aee679e19b7d34d9fc1242efef0b15397c512eb4522bfda065fe610b5598fe1", "MacAddress": "02:42:ac:13:00:03", "IPv4Address": "172.19.0.3/16", "IPv6Address": "" } }, "Options": {}, "Labels": {} } ]
可以在Containers部分查看到两个容器对应的IP地址。进入Ubuntu系统中可以查看到两块网卡:
1
2
3
4
5
6
7
8
9
10
11
12
13
14
15
16
17
18
19
20
21
22
23
24
$ ifconfig eth0: flags=4163<UP,BROADCAST,RUNNING,MULTICAST> mtu 1500 inet 172.17.0.2 netmask 255.255.0.0 broadcast 172.17.255.255 ether 02:42:ac:11:00:02 txqueuelen 0 (Ethernet) RX packets 17 bytes 1462 (1.4 KB) RX errors 0 dropped 0 overruns 0 frame 0 TX packets 0 bytes 0 (0.0 B) TX errors 0 dropped 0 overruns 0 carrier 0 collisions 0 eth1: flags=4163<UP,BROADCAST,RUNNING,MULTICAST> mtu 1500 inet 172.19.0.3 netmask 255.255.0.0 broadcast 172.19.255.255 ether 02:42:ac:13:00:03 txqueuelen 0 (Ethernet) RX packets 12 bytes 936 (936.0 B) RX errors 0 dropped 0 overruns 0 frame 0 TX packets 0 bytes 0 (0.0 B) TX errors 0 dropped 0 overruns 0 carrier 0 collisions 0 lo: flags=73<UP,LOOPBACK,RUNNING> mtu 65536 inet 127.0.0.1 netmask 255.0.0.0 loop txqueuelen 1000 (Local Loopback) RX packets 8 bytes 708 (708.0 B) RX errors 0 dropped 0 overruns 0 frame 0 TX packets 8 bytes 708 (708.0 B) TX errors 0 dropped 0 overruns 0 carrier 0 collisions 0
为了方便测试验证,我们在Ubuntu容器中安装基础工具,进行网络验证:
1
2
3
4
5
6
7
8
9
10
11
12
13
$ apt update $ apt install iputils-ping net-tools dnsutils $ ping -c 4 172.19.0.3 PING 172.19.0.3 (172.19.0.3) 56(84) bytes of data. 64 bytes from 172.19.0.3: icmp_seq=1 ttl=64 time=0.126 ms 64 bytes from 172.19.0.3: icmp_seq=2 ttl=64 time=0.185 ms 64 bytes from 172.19.0.3: icmp_seq=3 ttl=64 time=0.087 ms 64 bytes from 172.19.0.3: icmp_seq=4 ttl=64 time=0.099 ms --- 172.19.0.3 ping statistics --- 4 packets transmitted, 4 received, 0% packet loss, time 3030ms rtt min/avg/max/mdev = 0.087/0.124/0.185/0.037 ms
现在网络已经打通,我们可以通过dig命令指定DNS服务器为pi-hole的IP地址。
1
2
3
4
5
6
7
8
9
10
11
12
13
14
15
16
17
18
19
20
21
22
23
24
25
26
27
28
29
30
31
32
33
34
35
36
37
38
39
40
41
42
43
44
45
46
47
48
$ dig @172.19.0.2 google.com ; <<>> DiG 9.18.1-1ubuntu1.1-Ubuntu <<>> @172.19.0.2 google.com ; (1 server found) ;; global options: +cmd ;; Got answer: ;; ->>HEADER<<- opcode: QUERY, status: NOERROR, id: 64350 ;; flags: qr rd ra; QUERY: 1, ANSWER: 6, AUTHORITY: 0, ADDITIONAL: 1 ;; OPT PSEUDOSECTION: ; EDNS: version: 0, flags:; udp: 512 ;; QUESTION SECTION: ;google.com. IN A ;; ANSWER SECTION: google.com. 300 IN A 74.125.24.113 google.com. 300 IN A 74.125.24.100 google.com. 300 IN A 74.125.24.102 google.com. 300 IN A 74.125.24.138 google.com. 300 IN A 74.125.24.101 google.com. 300 IN A 74.125.24.139 ;; Query time: 7 msec ;; SERVER: 172.19.0.2#53(172.19.0.2) (UDP) ;; WHEN: Sun Jul 10 07:02:20 UTC 2022 ;; MSG SIZE rcvd: 135 $ dig @172.19.0.2 mclean.f.360.cn ; <<>> DiG 9.18.1-1ubuntu1.1-Ubuntu <<>> @172.19.0.2 mclean.f.360.cn ; (1 server found) ;; global options: +cmd ;; Got answer: ;; ->>HEADER<<- opcode: QUERY, status: NOERROR, id: 64995 ;; flags: qr aa rd ra; QUERY: 1, ANSWER: 1, AUTHORITY: 0, ADDITIONAL: 1 ;; OPT PSEUDOSECTION: ; EDNS: version: 0, flags:; udp: 4096 ;; QUESTION SECTION: ;mclean.f.360.cn. IN A ;; ANSWER SECTION: mclean.f.360.cn. 2 IN A 0.0.0.0 ;; Query time: 3 msec ;; SERVER: 172.19.0.2#53(172.19.0.2) (UDP) ;; WHEN: Sun Jul 10 07:16:16 UTC 2022 ;; MSG SIZE rcvd: 60
可以看到,google.com能够正常解析,mclean.f.360.cn已经被sinkhole。
接下来,准备两批域名批量做dig请求测试,一批为Alexa Top 5000,一批为Adlist Top 1000。其中Adlist地址可以在Group Management->Adlists中找到。批量通过很简单的shell脚本去实现:
1
2
3
4
5
6
7
$ cat t-1.sh# !/bin/bash cat $1 | while read line do echo $line dig @172.19.0.2 $line done
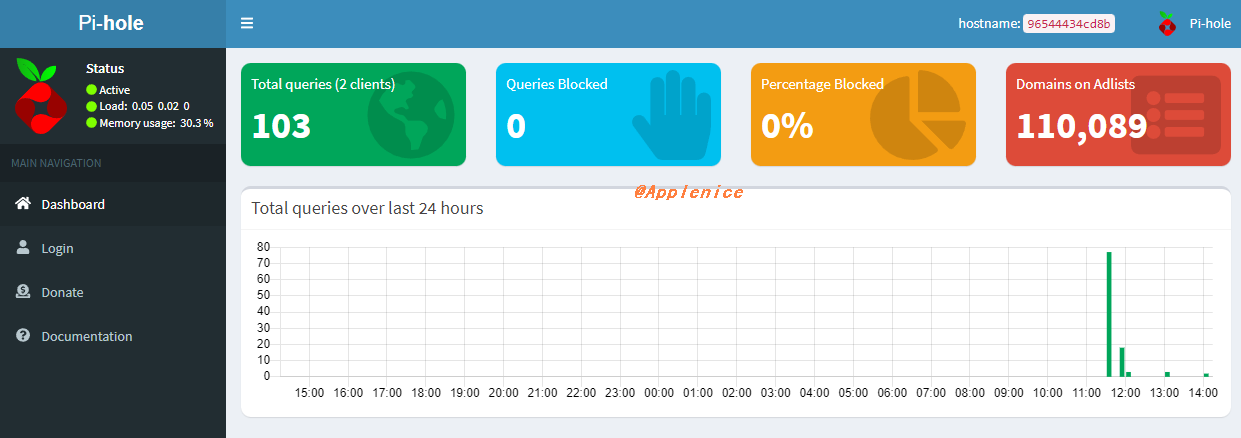
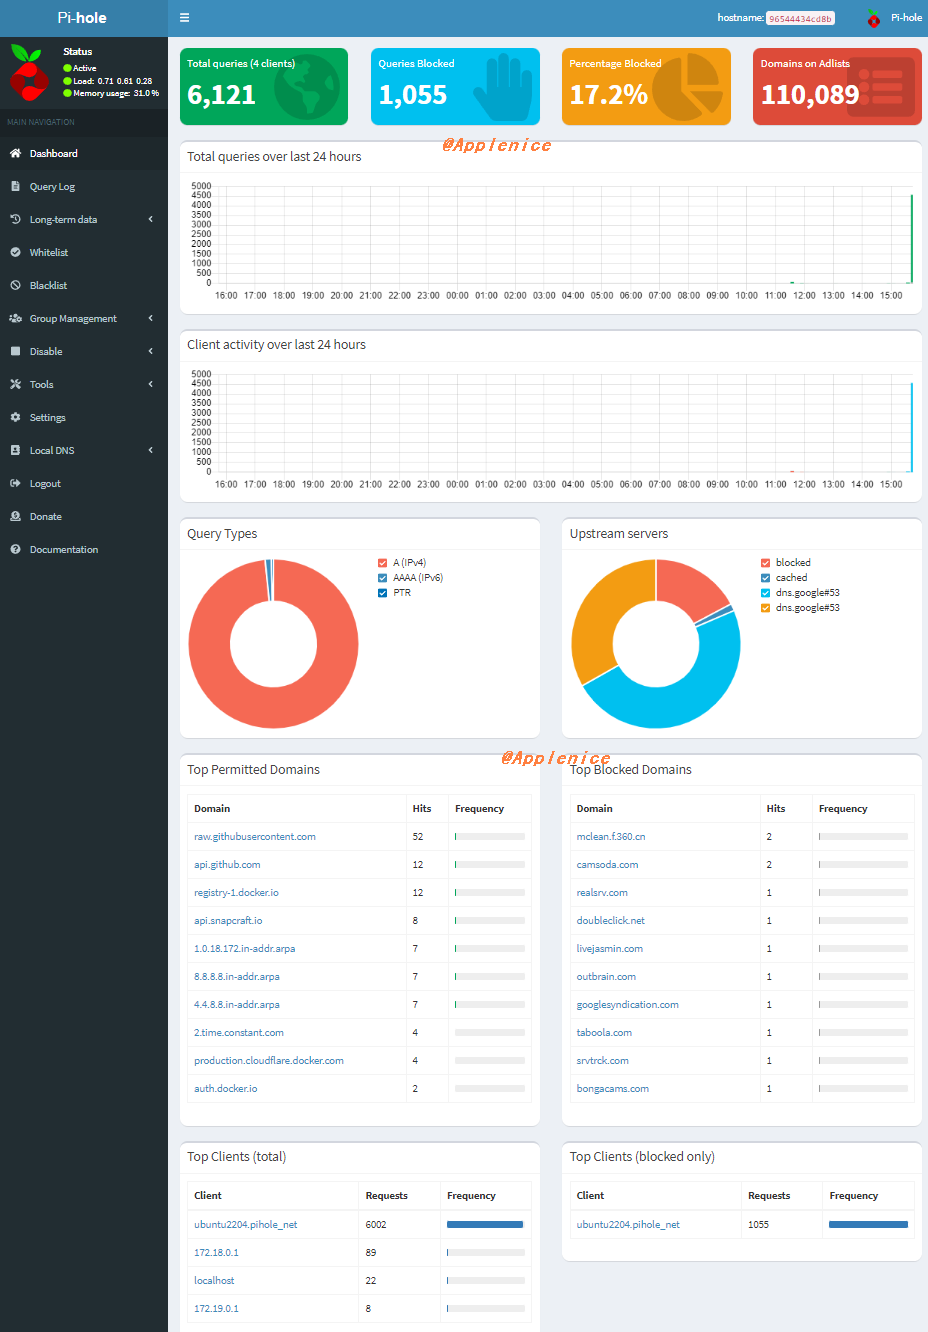
下面放两张图,分别是Pi-hole配置完的未登录状态和批量测试后的登录状态:
以上就是Pi-hole的Docker版本功能验证了,可以说非常的简单,在家里拿来屏蔽广告是个不错的选择,感兴趣的同学可以自行安装体验。关于sinkhole,实际攻防两方都会使用,我放了参考链接在下面,感兴趣的同学可以看看。
参考 1、https://sspai.com/post/58183 https://zh.m.wikipedia.org/zh-hans/DNS%E6%B2%89%E6%B4%9E https://encyclopedia.kaspersky.com/glossary/sinkhole/ https://resources.infosecinstitute.com/topic/dns-sinkhole/ https://www.malwarepatrol.net/dns-sinkholes-detect-and-protect/