pxd文件
在Cython中,可将指定的函数和类声明放在pxd文件中,提供给其他的模块复用,通过cimport语句访问。以实现切比雪夫距离函数为例,看一下怎么pxd文件是怎么使用的。
首先在mathlib.pyx文件中实现max和min函数:
1
2
3
4
5
6
7
8
|
cdef int max(int a, int b):
return a if a > b else b
cdef int min(int a, int b):
return a if a < b else b
|
在mathlib.pxd中声明函数max和min的原型:
1
2
3
4
5
|
cdef int max(int a, int b)
cdef int min(int a, int b)
|
新建一个模块,来使用mathlib,在distancee.pyx文件中导入模块mathlib,并实现切比雪夫距离函数:
1
2
3
4
5
6
7
|
from mathlib cimport max
def chebyshev(int x1, int y1, int x2, int y2):
return max(abs(x1 - x2), abs(y1 - y2))
|
接下来只需要在使用Python标准打包工具distutils来编译以上Cython代码,在setup.py文件中写入:
1
2
3
4
5
6
| from distutils.core import setup
from Cython.Build import cythonize
setup(name='distance',
ext_modules = cythonize(['distance.pyx', 'mathlib.pyx', 'mathlib.pxd'])
)
|
执行setup.py脚本:
1
2
3
4
5
6
7
8
9
10
11
12
13
14
| (Dev) $ python setup.py build_ext --inplace
Compiling distance.pyx because it changed.
Compiling mathlib.pyx because it changed.
[1/2] Cythonizing distance.pyx
[2/2] Cythonizing mathlib.pyx
running build_ext
building 'distance' extension
creating build
creating build/temp.linux-x86_64-3.7
gcc -pthread -Wno-unused-result -Wsign-compare -DNDEBUG -g -fwrapv -O3 -Wall -fPIC -I/home/top/myenv/Dev/include -I/usr/local/python3/include/python3.7m -c distance.c -o build/temp.linux-x86_64-3.7/distance.o
gcc -pthread -shared build/temp.linux-x86_64-3.7/distance.o -o /home/top/test/distance.cpython-37m-x86_64-linux-gnu.so
building 'mathlib' extension
gcc -pthread -Wno-unused-result -Wsign-compare -DNDEBUG -g -fwrapv -O3 -Wall -fPIC -I/home/top/myenv/Dev/include -I/usr/local/python3/include/python3.7m -c mathlib.c -o build/temp.linux-x86_64-3.7/mathlib.o
gcc -pthread -shared build/temp.linux-x86_64-3.7/mathlib.o -o /home/top/test/mathlib.cpython-37m-x86_64-linux-gnu.so
|
编译成功后的目录结构:
1
2
3
4
5
6
7
8
9
10
11
12
13
14
15
16
| (Dev) $ tree -h
.
├── [4.0K] build
│ └── [4.0K] temp.linux-x86_64-3.7
│ ├── [237K] distance.o
│ └── [ 99K] mathlib.o
├── [111K] distance.c
├── [113K] distance.cpython-37m-x86_64-linux-gnu.so
├── [ 152] distance.pyx
├── [ 98K] mathlib.c
├── [ 59K] mathlib.cpython-37m-x86_64-linux-gnu.so
├── [ 90] mathlib.pxd
├── [ 151] mathlib.pyx
└── [ 170] setup.py
2 directories, 10 files
|
此时在解释器中运行写好的切比雪夫函数:
1
2
3
| >>> import distance
>>> distance.chebyshev(5, 2, 10, 9)
7
|
数组
Cython中声明数组:
1
2
| cdef double arr[10]
cdef double res[5][2]
|
可以使用标准索引获取或者修改数组元素
numpy
Cython中提供了numpy模块(与Python模块numpy不同),直接操作Numpy数组的内存区域,极大的提升性能。
声明一个Numpy数组,可使用数据类型ndarray,在方括号中指定类型和维数,这种方法被称为缓冲区语法(buffer syntax):
1
2
| cimport numpy as cnp
cdef cnp.ndarray[double, ndim=2] arr
|
接下来以一个例子来比较Cython和Python的numpy计算速度,首先是Python中的numpy版本:
1
2
3
4
5
6
7
8
| In [2]: %%cython
import numpy as np
def numpy_bench_py():
py_arr = np.random.rand(1000)
cdef int i
for i in range(1000):
py_arr[i] += 1
|
使用Cython中numpy的ndarray类型,使用ndarray声明变量c_arr后,就可将一个使用Python模块numpy创建的数组赋给它。
1
2
3
4
5
6
7
8
9
10
11
| In [3]: %%cython
import numpy as np
cimport numpy as cnp
def numpy_bench_c():
cdef cnp.ndarray[double, ndim=1] c_arr
c_arr = np.random.rand(1000)
cdef int i
for i in range(1000):
c_arr[i] += 1
|
接下来对比两个函数的执行时间:
1
2
3
4
| In [4]: %timeit numpy_bench_c()
8.77 µs ± 98.9 ns per loop (mean ± std. dev. of 7 runs, 100000 loops each)
In [5]: %timeit numpy_bench_py()
253 µs ± 5.73 µs per loop (mean ± std. dev. of 7 runs, 1000 loops each)
|
代码分析
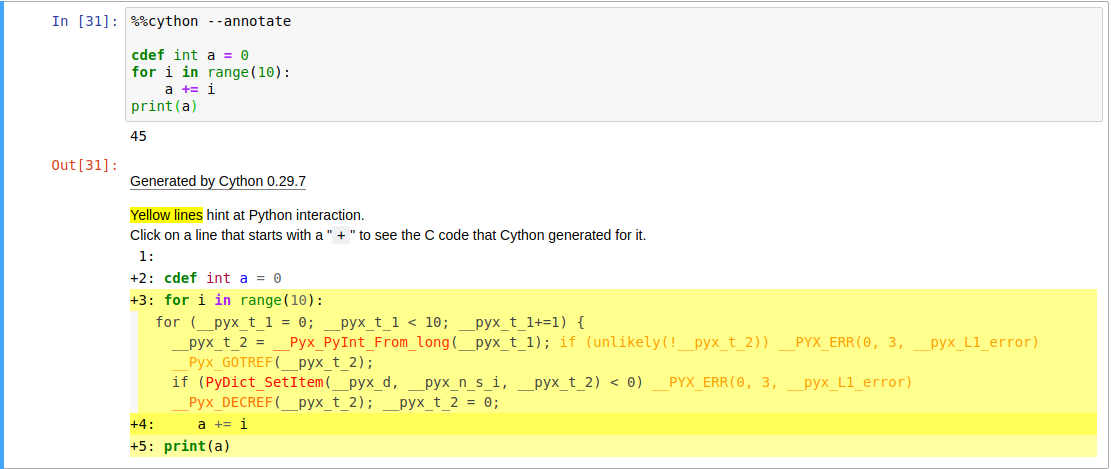
Cython提供了一种名为注释视图(annotated view)的功能,在Jupyter中可以通过传递--annotate选项来显示Cython的代码分析,图中的颜色越深就越表示与解析器调用的相关程度越高,如下图:
也可以通过命令行执行生成html文件:
1
| $ cython -a test_annotate.pyx
|
今天的学习就到这里了😛